
Web-installation manual
Setting up environment
For the DV Pay installer to work successfully, you must prepare the environment. If any of the packages are already installed - you can skip this step. Please pay attention to the minimum supported versions of each package.
Domain purchase
You will need a domain to host installer web interface, and subsequently personal DV Pay account. You can buy a domain from registrars GoDaddy, NameSilo or any other.
In the following examples we use the domain mydomain.com
System Setup
Open /etc/selinux/config file in editor:
vi /etc/selinux/config
Change status to disabled:
/etc/selinux/config
SELINUX=disabled
Reboot.
Install packages
| Software | Minimum requirements |
|---|---|
| nginx | 1.14.1 |
| redis | 5.0.0 |
| MySQL | 8.0.0 |
| PHP | 8 above and modules: fpm, cli, mysqlnd, pdo, pecl-memcache, xml, mbstring, zip, opcache, bcmath, intl, memcached, redis |
Create a user
Create a new user:
adduser server && usermod -aG wheel server
Download the installer
Create a new directory and upload the archive with the installer into it. For example, in /home/server/merchant:
mkdir -p /home/server/merchant
cd /home/server/merchant
wget https://github.com/dvpay/web-installer/releases/download/1.0.2/install.zip && unzip install.zip
Grant rights to the directory
Give the created user rights to the directory, where the installer is downloaded and unpacked:
chmod 755 /home/server
chown server:server -R /home/server/merchant
Add nginx configuration
In the `etc/nginx/conf.d` directory, create a configuration file with the extension .conf, give it a convenient name:
touch mydomain.com.conf
Fill the configuration file with the following code, substituting your domain (line 4) and path to php82.sock (lines 30, 45 и 51):
server {

    listen 80;
    server_name mydomain.com;

    add_header 'Access-Control-Allow-Headers' '*' always;
    add_header 'Access-Control-Allow-Origin' '*' always;

    access_log  /var/log/nginx/merchant.access.log;
    error_log   /var/log/nginx/merchant.error.log;

    root        /home/server/merchant;
    index       index.php, index.html;

    location /install {
        root /home/server/merchant;
        try_files $uri $uri/ /index.html?$args;
    }

    location / {
       root /home/server/merchant/frontend;
       try_files $uri $uri/ /index.html?$args;
    }

    location ^~ /api {
        alias /home/server/merchant/public;
        try_files $uri $uri/ @api;

        location ~ .php {
            fastcgi_pass unix:/var/run/php82.sock;
            fastcgi_split_path_info ^(.+.php)(.*)$;
            include fastcgi.conf;
            fastcgi_param SCRIPT_FILENAME /home/server/merchant/public/index.php;
        }
    }

    location @api {
        rewrite /api/(.*)$ /api/index.php?/$1 last;
    }

    location ~ api.php$ {
        include fastcgi.conf;
        fastcgi_param PHP_VALUE "max_execution_time = 900";
        fastcgi_param PHP_VALUE "max_input_time = 900";
        fastcgi_pass unix:/var/run/php82.sock;
        fastcgi_read_timeout 900;
    }

    location ~ .php$ {
        include fastcgi.conf;
        fastcgi_pass unix:/var/run/php82.sock;
    }

    location ~ /.(ht|svn|git) {
            deny all;
    }

}
Running the installer
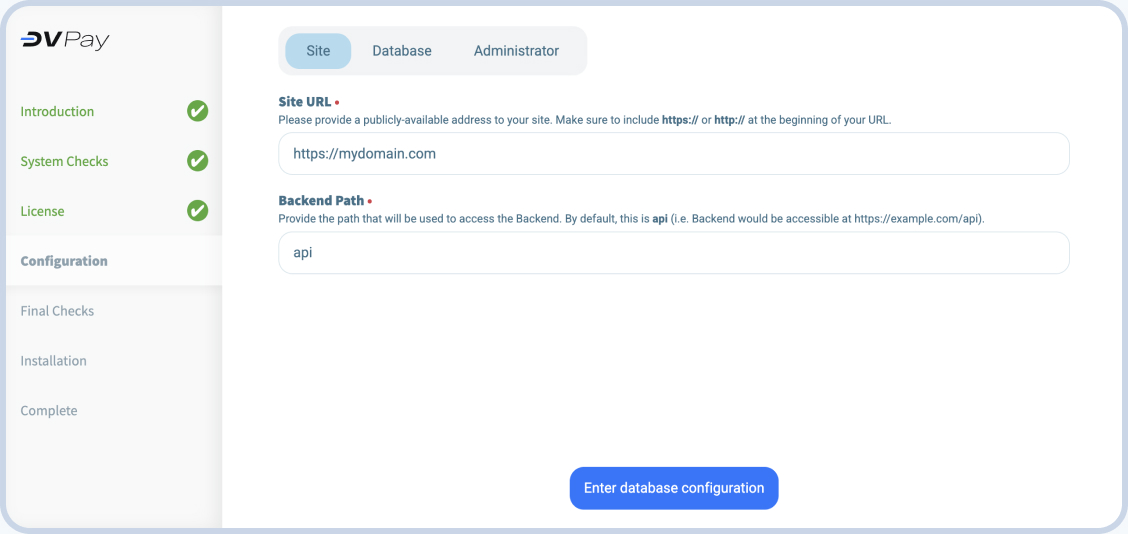
Now you are ready to run the installer - it will check matches the installed packages and will ask for the necessary information. Open your browser and go to link mydomain.com/install.html
1.Enter domain
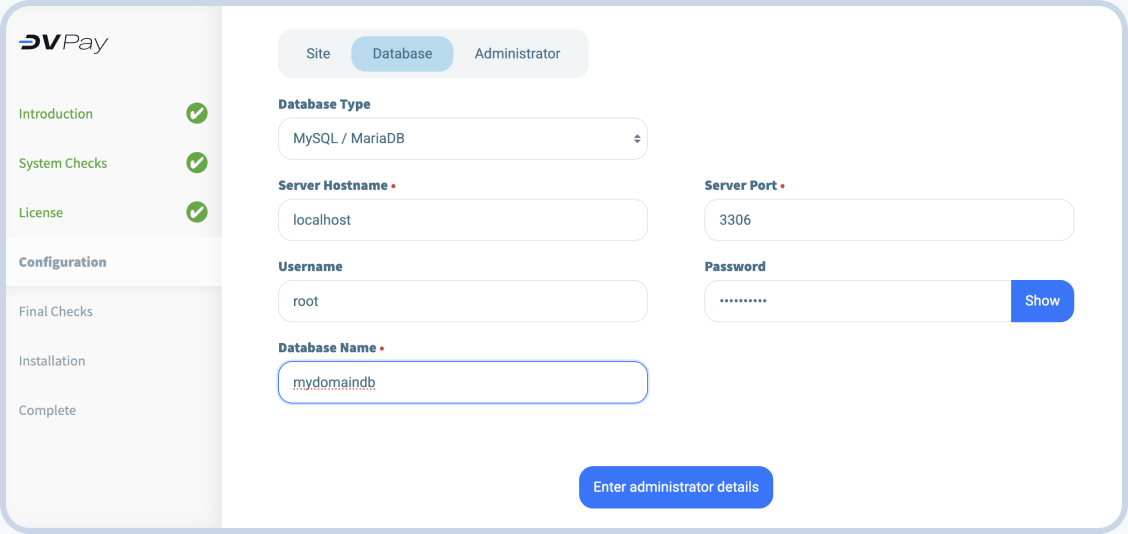
2.Connecting the database
Enter the email address that will be be used as a login, and also set password for the account.
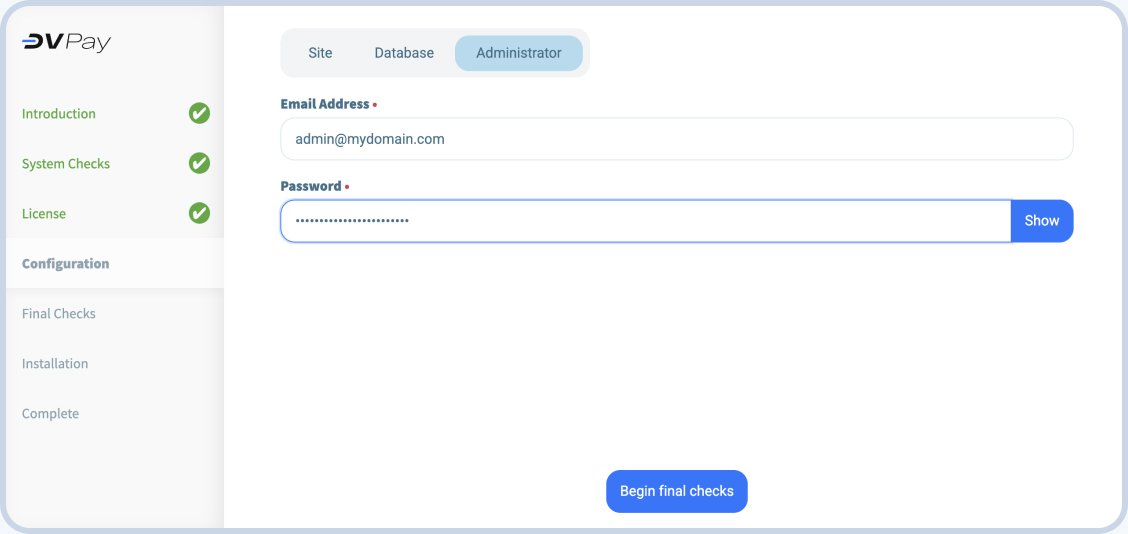
3.Set the login and password for admin
Enter the email address that will be be used as a login, and also set password for the account.
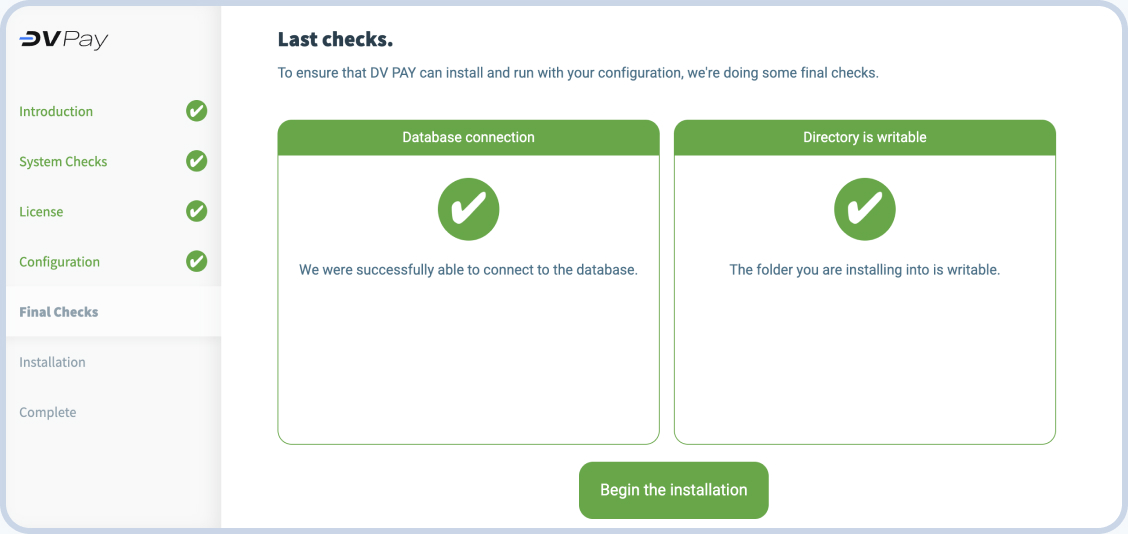
4.Complete installation
After checking access to the database, the installation will begin. Once the installation is complete, click the “go to website” button to go to your DV Pay personal account. Log in using the username and password that asked in the last step.
Setting up queues and cron
Setting up systemd configuration
Go to directory /etc/systemd/system/ and create 3 configuration files:
cd /etc/systemd/system
touch transfers.service [email protected]
Add configuration code to each file:
For the transfers.service file:
[Unit]
Description=Transfer to Processing
After=network.target

[Service]
Type=simple
User=server

WorkingDirectory=/home/server
ExecStart=/usr/bin/php /home/server/backend/artisan withdrawal:loop

Restart=on-failure
RestartSec=3
StandardOutput=syslog
StandardError=syslog
SyslogIdentifier=transfers

[Install]
WantedBy=multi-user.target
For the file [email protected]:
[Unit]
Description=Queue Worker %I
After=network.target

[Service]
User=server
Group=server
ExecStart=/usr/bin/php /home/server/backend/artisan queue:listen --queue=default,store-webhook,store-webhook-retry,notifications,monitor
Restart=on-failure

[Install]
WantedBy=multi-user.target
Run the demons:
systemctl enable transfers.service
systemctl enable [email protected]
systemctl enable [email protected]

systemctl start transfers.service
systemctl start [email protected]
systemctl start [email protected]
Setting up cron
Launch cron editor:
crontab -e
Add a regular launch setting:
* * * * * cd /path-to-your-project && php artisan schedule:run >> /dev/null 2>&1